These are the default Liferay 6 theme variables defined in init.vm.
I was searching but did not get any link ,so I hope this will help lot of
people also around  the globe. If anything goes  wrong, pls make a comment
and also try to add something that will help people around us.

## ———- Common variables ———- ##

$theme_display
$portlet_display
$theme_timestamp
$theme_settings
$css_class
$layout
$page_group
$liferay_toggle_controls
$liferay_dockbar_pinned
$css_folder
$images_folder
$javascript_folder
$templates_folder
$full_css_path
$full_templates_path
$css_main_file
$js_main_file
$company_id
$company_name
$company_logo
$company_logo_height
$company_logo_width
$company_url

$user_id
$is_default_user
$user_first_name
$user_middle_name
$user_last_name
$user_name
$is_male
$is_female
$user_birthday
$user_email_address
$language_id
$w3c_language_id
$time_zone
$user_greeting
$user_comments
$user_login_ip
$user_last_login_ip
$is_signed_in
$group_id

## ———- URLs ———- ##
$show_add_content
$add_content_text
$add_content_url
$layout_text
$layout_url
$show_control_panel
$control_panel_text
$control_panel_url
$show_home
$home_text
$home_url
$show_my_account
$my_account_text
$my_account_url
$show_page_settings
$page_settings_text
$page_settings_url
$show_sign_in
$sign_in_text
$sign_in_url
$show_sign_out
$sign_out_text
$sign_out_url
$show_toggle_controls
$toggle_controls_text
$toggle_controls_url
$update_available_url

## ———- Page ———- ##

$the_title
$selectable
$is_maximized
$is_freeform

$page_javascript_1
$page_javascript_2
$page_javascript_3
$layout
$page = $layout
$is_first_child
$is_first_parent
$the_title
$is_portlet_page

$all_portlets
$column_1_portlets
$column_2_portlets
$column_3_portlets
$column_4_portlets
$column_5_portlets
$maximized_portlet_id
$typeSettingsProperties
$page_javascript_1
$page_javascript_2
$page_javascript_3
$community_name
$css_class
$my_places_portlet_url
$community_default_public_url
$community_default_private_url
$community_default_url
$the_title
$layouts
$pages

## ———- Navigation ———- ##
$nav_items
$has_navigation

## ———- Staging ———- ##
$show_staging
$staging_text
## ———- My places ———- ##
$show_my_places
$my_places_text

## ———- Includes ———- ##
$dir_include
$bottom_include
$bottom_ext_include
$content_include
$top_head_include
$top_messages_include

## ———- Date ———- ##
$date
$current_time
$the_year

A divine of liferay
Default variables defined in theme
Follow me on
Liferay Gnosis

Extending and Overriding portal.properties
Hooks can be used to override the properties in portal.properties file.Not all properties can be overridden but the properties which are specified in the DTD of liferay-hook.xml for the liferay version you are running.
Now Let's take a property and customize it.As a liferay users all know about that "terms and condition" page will come when user first time logins into the portal.By default its value is true in properties file.
1. Create a Hook Project
2. Open liferay-hook.xml under docroot/WEB-INF/liferay-hook.xml
 3.Open liferay-hook.xml.You can have the overview of the liferay-hook.xml as follows.In this


6. Do the ant deploy
Test Case
1. Create an user
2. login to the portal
3. "terms of use" page will appear
4. ant deploy of hook
5. Now create another user
6. login to the portal
7. No "terms of use" page will appear.
Now Let's take a property and customize it.As a liferay users all know about that "terms and condition" page will come when user first time logins into the portal.By default its value is true in properties file.
terms.of.use.required=true
1. Create a Hook Project
2. Open liferay-hook.xml under docroot/WEB-INF/liferay-hook.xml
select Portal properties folder from the outline pallet to bring up the customize liferay portal
properties option.
4. Select the checkbox Customize Liferay Portal Properties an
d click on the three yellow
diamonds icon, Automatically portal.properties file will be created under docroot/WEB-INF/src.
It is as follows
5. And in the portal.properties file update the property to the false as follows
terms.of.use.required=false
6. Do the ant deploy
Test Case
1. Create an user
2. login to the portal
3. "terms of use" page will appear
4. ant deploy of hook
5. Now create another user
6. login to the portal
7. No "terms of use" page will appear.
Follow me on
Liferay Gnosis
Integrating Sonar with Liferay in windows
Sonar is an open source Platform used by development teams to manage source code quality. Sonar has been developed with a main objective, To make code quality management accessible to everyone with minimal effort.
And it aggregates many tools
A well written program is a program where cost of implementing a feature is constant throughout the program's lifetime
Prerequisites
Create the database by executing following command in Sql prompt
Refresh the database if you are using MySql workbench or Sqlyog
Otherwise execute following command and as a output you can see the list of databases,in those sonar is one of the databases.
Installing and Running Sonar server
1. Download sonar zip file from sonar Downloads page.
2. Extract it at your choice of location.(D:\sonarqube-4.4)
3. Open sonar config properties file in config folder of sonar home directory(D:\sonarqube-4.4\conf)
4. Provide your database username and password in sonar.properties file.
sonar.jdbc.password=
For myself i didn't give password.
5. By default it come with derby database so comment the following line in sonar.properties by
adding # before the line
6. Activate the Mysql database by uncomment following properties
7. Start the sonar by running StartSonar batch file located in bin
(D:\sonarqube-4.4\bin\windows-x86-64\StartSonar).
8. In console "The web server is started" message will be displayed.
9. To test the sonar is installed correct or not access the sonar server in browser
http://localhost:9000(Default port).
10. If you can see the following screen then you successfully completed sonar installation.
 11.Login using admin/admin
12. Goto configuration by clicking configuration link in top menu.
13. Click on Restore Profile link
Installing the Sonar Ant Task
1. To run Ant task we need to download the Sonar Ant task jar file from Sonar repository.Download
only “sonar-ant-task-1.3.jar” file, and save it in “D:\sonarJar\sonar-ant-task-1.3.jar“.
Integration with Liferay 6.2
The following steps tells about integration of Sonar with Liferay6.2
4. Now save the build.xml.
5. In eclipse import plugins project as "Existing project from workspace" under general.
6. Goto the Antview of the LIferay6.2 and add the plugins build.xml to the ant view.
7. If you observe Now we have Sonar Ant task as follows
 8. Instead of every time updating the build.xml for giving the project name i have created one
.properties file and reading those properties from properties file to the pligins build.xml by using
following tag.
9. Create sonardeploy.properties file in the sam location of liferay plugins build.xml(E:\Liferay
\Liferay 6.2\workspace\plugins) And add the following properties
projectName=CreateMeeting-portlet
#This is the name of the project which will be shown in Sonar portal
projectNameInSonarPortal=CreateMeeting
10. Save it and execute Sonar ant ask in ant view.Before that we have to deploy our portlet in
liferay server.
Deploy the portlet in liferay server by executing ant deploy of that particular portlet build.xml
Execute the Sonar ant ask through plugins build.xml
11. Now refresh the sonar server in web browser( http://localhost:9000)
12. You can see your project with the name(CreateMeeting) given for the property
projectNameInSonarPortal in sonardeploy.properties as like below.

13. If we click on project name, we can see all the violations, boilerplate code and etc regarding
project.
Congratualtions...!!!. You have completed successfully.
And it aggregates many tools
- Static analysis(PMD, Find bugs, Check Style)
- Duplicate code(Squid,CPD)
- Code coverage(Cobertura,JaCoCo)
What is code quality?
It is an indicator about how quickly developers can add business value to a software system.
It is an indicator about how quickly developers can add business value to a software system.
A well written program is a program where cost of implementing a feature is constant throughout the program's lifetime
Prerequisites
- Windows(xp/vista or 7)
- Ant 1.8.3
- Java 1.6
- Mysql 5.0
- Sonar 4.0
- Sonar Ant Task 1.3 jar
Create the database by executing following command in Sql prompt
create database sonar;
Refresh the database if you are using MySql workbench or Sqlyog
Otherwise execute following command and as a output you can see the list of databases,in those sonar is one of the databases.
show databases;
Installing and Running Sonar server
1. Download sonar zip file from sonar Downloads page.
2. Extract it at your choice of location.(D:\sonarqube-4.4)
3. Open sonar config properties file in config folder of sonar home directory(D:\sonarqube-4.4\conf)
4. Provide your database username and password in sonar.properties file.
sonar.properties
sonar.jdbc.username=rootsonar.jdbc.password=
For myself i didn't give password.
5. By default it come with derby database so comment the following line in sonar.properties by
adding # before the line
#sonar.jdbc.url=jdbc:h2:tcp://localhost:9092/sonar
6. Activate the Mysql database by uncomment following properties
sonar.jdbc.url=jdbc:mysql://localhost:3306/sonar?useUnicode=true&characterEncoding=utf8 sonar.jdbc.driverClassName: com.mysql.jdbc.Driver
7. Start the sonar by running StartSonar batch file located in bin
(D:\sonarqube-4.4\bin\windows-x86-64\StartSonar).
8. In console "The web server is started" message will be displayed.
9. To test the sonar is installed correct or not access the sonar server in browser
http://localhost:9000(Default port).
10. If you can see the following screen then you successfully completed sonar installation.
12. Goto configuration by clicking configuration link in top menu.
13. Click on Restore Profile link
Installing the Sonar Ant Task
1. To run Ant task we need to download the Sonar Ant task jar file from Sonar repository.Download
only “sonar-ant-task-1.3.jar” file, and save it in “D:\sonarJar\sonar-ant-task-1.3.jar“.
Integration with Liferay 6.2
The following steps tells about integration of Sonar with Liferay6.2
Making Sonar library available to Liferay
1. Open the eclipse Liferay6.2 Environment
2. Goto Window → Preferences → Ant → Runtime
3. Click on AntHomeLibraries
4. Click on Add External Jars
5. Give the path of sonar-ant-task-1.3.jar
6. Click on Apply and then Ok
7. Now the jar is available to Liferay Environment
Sonar Ant Target
1. Open plugins folder of Liferay6.2
2. We can find build.xml file,Open it
3. Add the Sonar Ant target as follows
<!--This is the sonar target for testing the code quality-->
<!-- The properties file to give your projectname -->
<property file="sonardeploy.properties"></property>
<target name="sonar">
<property name="sonar.host.url" value="http://localhost:9000" />
<property name="sonar.jdbc.url" value="jdbc:mysql://localhost:3306
/sonar?useUnicode=true&characterEncoding=utf8" />
<property name="sonar.jdbc.driverClassName" value="com.mysql.jdbc.Driver" />
<!-- the username and password of your database -->
<property name="sonar.jdbc.username" value="root" />
<property name="sonar.jdbc.password" value="" />
<!-- list of mandatories Sonar properties -->
<property name="sonar.sources" value="portlets/${projectName}/docroot
/WEB-INF/src" />
<property name="sonar.projectName" value="${projectNameInSonarPortal}" />
<property name="sonar.binaries" value="portlets/${projectName}/docroot
/WEB-INF/classes" />
<property name="sonar.libraries" value="portlets/${projectName}/docroot
/WEB-INF/lib" />
<!-- The console info -->
<echo>The given project name ${projectName}</echo>
<echo>The project name in sonar portal ${projectNameInSonarPortal}</echo>
<echo>The sonar sources directory ${sonar.sources}</echo>
<!-- Execute Sonar -->
<sonar:sonar key="encore-portal" version="0.1-SNAPSHOT"
xmlns:sonar="antlib:org.sonar.ant"/
</target>
4. Now save the build.xml.
5. In eclipse import plugins project as "Existing project from workspace" under general.
6. Goto the Antview of the LIferay6.2 and add the plugins build.xml to the ant view.
7. If you observe Now we have Sonar Ant task as follows
.properties file and reading those properties from properties file to the pligins build.xml by using
following tag.
<!-- The properties file to give your projectname -->
<property file="sonardeploy.properties"></property>
<property file="sonardeploy.properties"></property>
9. Create sonardeploy.properties file in the sam location of liferay plugins build.xml(E:\Liferay
\Liferay 6.2\workspace\plugins) And add the following properties
sonardeploy.properties
#This is the name of the portlet or name of the one of plugins(Ext or Hook)projectName=CreateMeeting-portlet
#This is the name of the project which will be shown in Sonar portal
projectNameInSonarPortal=CreateMeeting
10. Save it and execute Sonar ant ask in ant view.Before that we have to deploy our portlet in
liferay server.
Deploy the portlet in liferay server by executing ant deploy of that particular portlet build.xml
Execute the Sonar ant ask through plugins build.xml
11. Now refresh the sonar server in web browser( http://localhost:9000)
12. You can see your project with the name(CreateMeeting) given for the property
projectNameInSonarPortal in sonardeploy.properties as like below.
13. If we click on project name, we can see all the violations, boilerplate code and etc regarding
project.
Congratualtions...!!!. You have completed successfully.
Note:Please observe the ant sonar target code in build.xml.It is applicable only for to test the code quality of portlets.If you want to test other plugins like ext,hook then we have to change the path of the following properties.
- sonar.sources
- sonar.binaries
- sonar.libraries
Follow me on
Liferay Gnosis
Customizing Sites and Site Templates with Application Adapters
if you need to customize specific sites without propagating the customization throughout the entire portal then use Application Adapters.
Purpose
By default,When we customize the JSP files through the hooks,changes applied globally to all liferay sites.For site specific jsp file customization,Liferay provides a very strong feature called application adapter.
To restrict JSP customization to specific site or site template add the following code snippet to the liferay-hook.xml
<hook>
<custom-jsp-dir>/META-INF/custom_jsps</custom-jsp-dir>
<custom-jsp-global>false</custom-jsp-global>
</hook>
<custom-jsp-dir>/META-INF/custom_jsps</custom-jsp-dir>
<custom-jsp-global>false</custom-jsp-global>
</hook>
How to create an Application Adapter
1. Create a Hook Project
2. Open liferay-hook.xml under docroot/WEB-INF/liferay-hook.xml
3. You can have the overview of the liferay-hook.xml as follows.In this select Custom Jsps folder from the outline pallet to bring up the custom jsps option

4. Select the checkbox Customize Liferay Portal JSPs and create the default custom JSP folder
/META-INF/custom_jsps by clicking the icon that has the three yellow diamonds.By clicking
this icon it will create custom_jsps folder under META-INF of our project.It is as follows
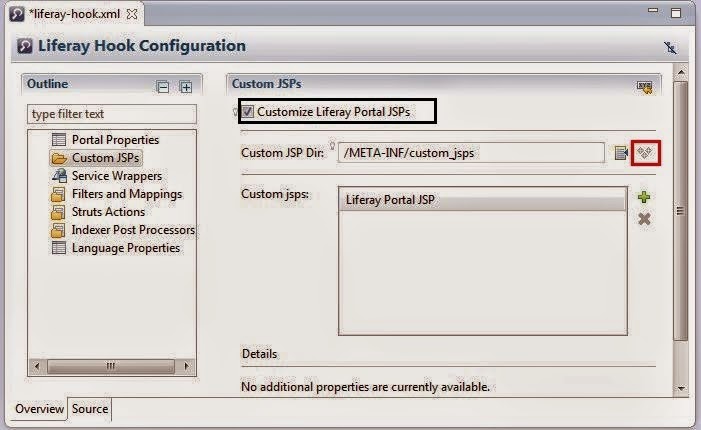
5. Now add the existing JSP page of portal which you want to customize by clicking the plus icon(+).
Here we chosen html/portlet/navigation.jsp and click on source(Highlighted by Red color in the image below) view at bottom left of the xml file.

6. Add the following code snippet to the liferay-hook.xml
<hook>
<custom-jsp-dir>/META-INF/custom_jsps</custom-jsp-dir>
<custom-jsp-global>false</custom-jsp-global>
</hook>
<custom-jsp-dir>/META-INF/custom_jsps</custom-jsp-dir>
<custom-jsp-global>false</custom-jsp-global>
</hook>
To turn the hook’s global custom JSP setting off put the value of <custom-jsp-global> to false.
7. This step is important.If you observe the xml file it is not yet saved.So Please save the file by
clicking ctrl+s.
8.Open docroot\META-INF\custom_jsps\html\portlet\login\navigation.jsp file and add the following code
<%@ taglib uri="http://liferay.com/tld/util" prefix="liferay-util" %>
<liferay-util:include page="/html/portlet/navigation/view.jsp" useCustomPage="false" />
<p>
This was modified by the Sample Application Adapter.
</p>
<liferay-util:include page="/html/portlet/navigation/view.jsp" useCustomPage="false" />
<p>
This was modified by the Sample Application Adapter.
</p>
For Application adapter hooks include the original jsp by including <liferay-util:include page> tag's
useCustomPage attribute to false.Do not include the jsp like appending the suffix .portal.jsp to the original file name.Appending the suffix is only applicable for global hooks.
9. Deploy Application adapter Hook plugin.
10. Open liferay portal instance
Test Case
1.Create two sites
SiteWithApplicationAdapter
a) Goto ControlPanelàSiteàClick on AddàBlank Site
b) Give Site name as SiteWithApplicationAdapter
c) Click on Save,It will navigate to the Site Settings as follows.
ScrollDown,In the configuration you can select the Application Adapter with your hook name(SampleApplicaationAdapter)

WithOutApplicationAdapter
Follow the same steps but do not select ApplicationAdapter.
2. Create two pages for every site then only you can see and navigate to created sites to see the output.
3. Add the Navigation portlet in one of the pages created for each site
b) Give Site name as SiteWithApplicationAdapter
c) Click on Save,It will navigate to the Site Settings as follows.
ScrollDown,In the configuration you can select the Application Adapter with your hook name(SampleApplicaationAdapter)
WithOutApplicationAdapter
Follow the same steps but do not select ApplicationAdapter.
2. Create two pages for every site then only you can see and navigate to created sites to see the output.
3. Add the Navigation portlet in one of the pages created for each site
4. Now Observe the results by accessing two urls
http://localhost:8686/web/sitewithoutapplicationadapter/home

http://localhost:8686/web/sitewithapplicationadapter/home

Congratulations !!!
http://localhost:8686/web/sitewithoutapplicationadapter/home
http://localhost:8686/web/sitewithapplicationadapter/home
Congratulations !!!
Follow me on
Liferay Gnosis
Customizing JSPs by Extending the Original by Using Hook
We can replace a existing JSP by HOOK Plugin.But if we want to preserve the existing functionality and add more functionality to existing one also possible by HOOK Plugin.The process is as follows
1. Create a Hook Project
2. Open liferay-hook.xml under docroot/WEB-INF/liferay-hook.xml


8. Notice how this code assigns the original JSP’s HTML content to the variable
proceed to add some more content of our own to that HTML and then display it.
9. Deploy the hook plugin and add the Blogs portlet to a page.
10. Add a blog and then use the Blog portlet’s search.
Test Case
1. Sign in to the portal
2. Create one page and add Blogs portlet to that page
3. Create one Blog by clicking Add Entry
4. In the top right of Blog Portlet type any blog title which is not created and then click search.
5. Observe the results,it is same as the message given in the search.jsp.it is as below

1. Create a Hook Project
2. Open liferay-hook.xml under docroot/WEB-INF/liferay-hook.xml
3. Open liferay-hook.xml.You can have the overview of the liferay-hook.xml as follows.In this
select Custom Jsps folder from the outline pallet to bring up the custom jsps option
4. Select the checkbox Customize Liferay Portal JSPs and create the default custom JSP folder
/META-INF/custom_jsps by clicking the icon that has the three yellow diamonds.By clicking
this icon it will create custom_jsps folder under META-INF of our project.It is as follows
5. Now add the existing JSP page of portal which you want to customize by clicking the plus icon(+).
Here we chosen blogs/search.jsp
6. This step is important.If you observe the xml file it is not yet saved.So Please save the file by
clicking ctrl+s.
7. Replace the JSPs code with the following:<%@ taglib uri="http://liferay.com/tld/util" prefix="liferay-util" %>
<%@ page import="com.liferay.portal.kernel.util.StringUtil" %>
<liferay-util:buffer var="html">
<liferay-util:include page="/html/portlet/blogs/search.portal.jsp" />
</liferay-util:buffer>
<%
html = StringUtil.add(
html,
"Didn't find what you were looking for? Refine your search and " +
"try again!",
"\n");
%>
<%= html %>8. Notice how this code assigns the original JSP’s HTML content to the variable
html. Weproceed to add some more content of our own to that HTML and then display it.
9. Deploy the hook plugin and add the Blogs portlet to a page.
10. Add a blog and then use the Blog portlet’s search.
Test Case
1. Sign in to the portal
2. Create one page and add Blogs portlet to that page
3. Create one Blog by clicking Add Entry
4. In the top right of Blog Portlet type any blog title which is not created and then click search.
5. Observe the results,it is same as the message given in the search.jsp.it is as below
Follow me on
Liferay Gnosis
How to create a hook in LIferay
1. Goto File → New → Liferay Plugin Project

2. Give Project name and display name(It displays automatically when you are giving project
name in a grey color)
3. Select the Build type,Plugins SDK and Liferay runtime
Build type: Ant
Plugins SDK:
Liferay runtime:
4. Select the plugin type as Hook
5. Click finish
You can find the steps 2 to 5 from the following image

You can find the hook in project explorer as follows

2. Give Project name and display name(It displays automatically when you are giving project
name in a grey color)
3. Select the Build type,Plugins SDK and Liferay runtime
Build type: Ant
Plugins SDK:
[a configured Plugins SDK] Liferay runtime:
[a configured Liferay runtime]4. Select the plugin type as Hook
5. Click finish
You can find the steps 2 to 5 from the following image
You can find the hook in project explorer as follows
Follow me on
Liferay Gnosis
Integrating Solr with liferay in windows
- Download the Solr-4.10.2 release from Solr.
- Unzip .zip in some location(E:\Liferay\Integrations).It is Slor home directory.
- Copy the solr-4.10.2.war from Solr home dirctory\dist (E:\Liferay\Integrations\solr-4.10.2\dist) and paste it into E:\Liferay\Integrations\solr-4.10.2\example\solr.
- Open up the E:\Liferay\Integrations\solr-4.10.2\example\solr\collection1\conf\solrconfig.xml.
- It is recommended to run the Solr instance on seperate tomcat instance other than liferay tomcat.
- So for seperate tomact for solr download tomcat zip
- It is tomcat home folder(E:\Liferay\solr\apache-tomcat-7.0.50).
- In the tomcat home folder under config create directory tomcathome/Catalina/localhost,Under this directory create solr.xml file and copy the following content into the file and save it.
- Copy the jars from solr/example/lib/ext into your container's main lib directory. These jars will set up SLF4J and log4j. (E:\Liferay\solr\apache-tomcat-7.0.50\lib)
- Download the commons-logging jar also and paste in E:\Liferay\solr\apache-tomcat-7.0.50\lib.
- Now start tomcat and check that it is running without any error or not.
Replace
<dataDir>${solr.data.dir: ./solr/data}</dataDir>
by following
<dataDir>${solr.data.dir:E:\Liferay\Integrations\solr-4.10.2\example\solr\collection1\data}</dataDir>
<dataDir>${solr.data.dir: ./solr/data}</dataDir>
by following
<dataDir>${solr.data.dir:E:\Liferay\Integrations\solr-4.10.2\example\solr\collection1\data}</dataDir>
Note: The dataDir can also be temporarily overridden with the JAVA_OPTS environment variable prior to starting Tomcat
JAVA_OPTS="-Dsolr.data.dir=/Solr_Home/solr/example/solr/data"
<Context docBase="E:/Liferay/Integrations/solr-4.10.2/example/solr/solr-4.10.2.war" debug="0" crossContext="true">
<Environment name="solr/home" type="java.lang.String" value="E:\Liferay\Integrations\solr-4.10.2\example\solr" override="true"/>
</Context>
Integrating Solr plugin with Liferay
Download Solr plugin which is compatible with the Liferay version.
Drop the plugin into Liferay_Home/deploy directory.
Start liferay tomcat server. After started liferay tomcat, just stop both the tomcat servers (SOLR_TOMCAT and LIFERAY_TOMCAT).
Openup the Liferay_Home/apache-tomcat-7.0.50/webapps/solr-web/WEB-INF/classes/META-INF/solr-spring.xml
for bean id=”solrServer” give the solar tomcat settings and save it.
for eg. http://localhost:8080/solr
Copy the Liferay_Home/apache-tomcat-7.0.50/webapps/solr-web/WEB-INF/conf/schema.xml file and paste it into E:\Liferay\Integrations\solr-4.10.2\example\solr\conf\ directory.
Follow me on
Liferay Gnosis
Liferay Configurable Portlet Preferences
In this section we will see how to do portlet preferences.
Portlet preferences are useful for Administrators and Users.
Administrators it is useful for customized views of portlet to subset of users or all of the users.
Users access themselves for configuring a portlet just the way they like it.
Lets dive into portlet preferences by running through an example of creating configuration page for portlet.
Steps to create preferences page
<value>/html/library/configuration.jsp</value>
</init-param>
Step 2: Create configuration Jsp for displaying the portlet preferences options
Now lets begin creating our portlet preference for configuration page preferences content.Add the following code to the configuration.jsp
In your init.jsp add the following code
The taglib directives access the JSTL,Liferay taglib and theme taglib.<portlet:defineObjects/> tag to access implicit varibles like renderURL .
Step 3: Create configuration action implementation class for processing the portlet preference value.
Now lets create custom configuration action class for accessing the portlet preference and extend DefaultConfigurationAction class.
Portlet preferences are useful for Administrators and Users.
Administrators it is useful for customized views of portlet to subset of users or all of the users.
Users access themselves for configuring a portlet just the way they like it.
Lets dive into portlet preferences by running through an example of creating configuration page for portlet.
Steps to create preferences page
- Specify a configuration Jsp page in portlet.xml
- Create configuration Jsp for displaying the portlet preferences options
- Create configuration action implementation class for processing the portlet preference value
- Modify the View jsp to respond to the current Portlet Preference Value.
Before doing above steps pre requsite step is create default Setup tab in the Portlet's Configuration page.
Creating the default configuration page as follows
Open the liferay-portlet.xml and add the element
<configuration-action-class>
com.liferay.portal.kernel.portlet.DefaultConfigurationAction</configuration-action-class>
below <icon>....</icon> tag .
Create one portlet which is having the service layer also.
Step 1: Specify a configuration Jsp page in portlet.xml
- We will create a configuration jsp in docroot/library/html/configuration.jsp
- Configure that jsp as a init param has name as config-template and value as path of jsp in portlet.xml as follows.
<init-param>
<name>config-template</name><value>/html/library/configuration.jsp</value>
</init-param>
Step 2: Create configuration Jsp for displaying the portlet preferences options
Now lets begin creating our portlet preference for configuration page preferences content.Add the following code to the configuration.jsp
<%@include file="init.jsp" %>
<liferay-portlet:actionURL portletConfiguration="true" var="configurationURL" />
<%
boolean showAuthor_cfg = GetterUtil.getBoolean(portletPreferences.getValue("showAuthor", StringPool.TRUE));
%>
<aui:form action="<%= configurationURL %>" method="post" name="fm">
<aui:input name="showAuthor" type="checkbox" value="<%= showAuthor_cfg %>" />
<aui:button-row>
<aui:button type="submit" />
</aui:button-row>
</aui:form>
In your init.jsp add the following code
<%@ taglib uri="http://java.sun.com/portlet_2_0" prefix="portlet" %>
<%@ taglib uri="http://liferay.com/tld/aui" prefix="aui" %><%@
taglib uri="http://liferay.com/tld/portlet" prefix="liferay-portlet" %><%@
taglib uri="http://liferay.com/tld/security" prefix="liferay-security" %><%@
taglib uri="http://liferay.com/tld/theme" prefix="liferay-theme" %><%@
taglib uri="http://liferay.com/tld/ui" prefix="liferay-ui" %><%@
taglib uri="http://liferay.com/tld/util" prefix="liferay-util" %>
<%@ taglib uri="http://liferay.com/tld/portlet" prefix="liferay-portlet" %>
<%@ taglib uri="http://liferay.com/tld/theme" prefix="liferay-theme" %>
<%@ taglib uri="http://java.sun.com/jsp/jstl/core" prefix="c" %>
<%@ page import="com.liferay.portal.kernel.util.Constants" %>
<%@ page import="com.liferay.portal.kernel.util.GetterUtil" %>
<%@ page import="com.liferay.portal.kernel.util.StringPool" %>
<portlet:defineObjects />
<liferay-theme:defineObjects />
The taglib directives access the JSTL,Liferay taglib and theme taglib.<portlet:defineObjects/> tag to access implicit varibles like renderURL .
Step 3: Create configuration action implementation class for processing the portlet preference value.
Now lets create custom configuration action class for accessing the portlet preference and extend DefaultConfigurationAction class.
- Create one package com.laxman.preferences in the portlet's docroot/WEB-INF/src directory.
- Create a class named ConfigurationActionImpl and extends DefaultConfigurationAction as its super class.
package com.laxman.preferences;
import javax.portlet.ActionRequest;
import javax.portlet.ActionResponse;
import javax.portlet.PortletConfig;
import javax.portlet.PortletPreferences;
import com.liferay.portal.kernel.portlet.DefaultConfigurationAction;
public class ConfigurationActionImpl extends DefaultConfigurationAction {
@Override
public void processAction(
PortletConfig portletConfig, ActionRequest actionRequest,
ActionResponse actionResponse) throws Exception {
super.processAction(portletConfig, actionRequest, actionResponse);
PortletPreferences prefs = actionRequest.getPreferences();
String showLocationAddress = prefs.getValue(
"showAuthor", "true");
}
}
Let's specify our new custom configuration class in the liferay-portlet.xml.Replace the existing <configuration-action-class>....</configuration-action-class> with
<configuration-action-class>com.laxman.preferences.ConfigurationActionImpl</configuration-action-class>
.
Step 4: Modify the view.jsp to respond to the current Portlet Preference Value.
Create a view_all_student.jsp in docroot/html/library/view_all_student.jsp and add the following code.
<%@page import="com.library.slayer.service.LMSBookLocalServiceUtil"%>
<%@page import="javax.portlet.PortletURL"%>
<%@taglib uri="http://liferay.com/tld/ui" prefix="liferay-ui" %>
<%@ include file="init.jsp"%>
<%
boolean showAuthor_view = GetterUtil.getBoolean(portletPreferences.getValue("showAuthor", StringPool.TRUE));
%>
<liferay-portlet:renderURL varImpl="iteratorURL">
<portlet:param name="mvcPath" value="/html/library/view_all_student.jsp" />
</liferay-portlet:renderURL>
<a href="<portlet:renderURL />">«Home</a>
<div class="separator"></div>
<liferay-ui:search-container emptyResultsMessage="there-are-no-students"
headerNames="bookId,bookTitle,author,dateAdded"
iteratorURL="<%=iteratorURL %>"
delta="5"
deltaConfigurable="true"
total="<%=LMSBookLocalServiceUtil.getLMSBooksCount()%>"
>
<liferay-ui:search-container-results results=" <%=LMSBookLocalServiceUtil.
getLMSBooks(searchContainer.getStart(), searchContainer.getEnd()) %>"/>
<liferay-ui:search-container-row className="com.library.slayer.model.LMSBook"
keyProperty="bookId" modelVar="currentStudent">
<liferay-portlet:renderURL varImpl="rowURL">
<portlet:param name="backURL" value="<%=currentUrl %>" />
<portlet:param name="mvcPath" value="/html/library/display_book.jsp" />
<portlet:param name="bookId" value="<%= String.valueOf(currentStudent.getBookId()) %>" />
</liferay-portlet:renderURL>
<liferay-ui:search-container-column-text href="<%= rowURL %>"
name="bookId" property="bookId" />
<liferay-ui:search-container-column-text href="<%= rowURL %>"
name="bookTitle" property="bookTitle" />
<c:choose>
<!--Based on the preference value it will show this column-->
<c:when test="<%= showAuthor_view ==true %>">
<liferay-ui:search-container-column-text href="<%= rowURL %>"
name="author" property="author" />
</c:when>
</c:choose>
</liferay-ui:search-container-row>
<liferay-ui:search-iterator searchContainer="<%= searchContainer %>" />
</liferay-ui:search-container>
Add the following code snippet to the view.jsp
<%@ include file="view_all_student.jsp"%>
Follow me on
Liferay Gnosis
How to do Actions menu in Liferay
In
this section we will see how to add set of "actions" embedded within
the search container in every row. The following code snippet is responsible
for rendering the actions menu button
|
This is two step process
Define render url
Create a actions menu
In the above snippet i defined a two render urls named updateStatusURL
and updateWorklogURL.So when i click on Update Status action menu button it will navigate to the repective page defined in updateStatusURL render url variable.
Same thing will happen for Update Worklog also.
Follow me on
Liferay Gnosis
RenderRequest Vs ActionRequest
In
this section we will see how to add set of "actions" embedded within
the search container in every row. The following code snippet is responsible
for rendering the actions menu button
|
This is two step process
Define render url
Create a actions menu
In the above snippet i defined a two render urls named updateStatusURL
and updateWorklogURL.So when i click on Update Status action menu button it will navigate to the repective page defined in updateStatusURL render url variable.
Same thing will happen for Update Worklog also.
Follow me on
Liferay Gnosis
Compare between JSR-168 and 286
In
this section we will see how to add set of "actions" embedded within
the search container in every row. The following code snippet is responsible
for rendering the actions menu button
|
This is two step process
Define render url
Create a actions menu
In the above snippet i defined a two render urls named updateStatusURL
and updateWorklogURL.So when i click on Update Status action menu button it will navigate to the repective page defined in updateStatusURL render url variable.
Same thing will happen for Update Worklog also.
Follow me on
Liferay Gnosis
Anatomy of Portlet
In
this section we will see how to add set of "actions" embedded within
the search container in every row. The following code snippet is responsible
for rendering the actions menu button
|
This is two step process
Define render url
Create a actions menu
In the above snippet i defined a two render urls named updateStatusURL
and updateWorklogURL.So when i click on Update Status action menu button it will navigate to the repective page defined in updateStatusURL render url variable.
Same thing will happen for Update Worklog also.
Follow me on
Liferay Gnosis
Liferay Portal folder structure and their contents
Folder
|
Details
|
Benchmarks
|
Contains the script for testing the performance of Liferay portal using a tool called Grinder
|
Classes
|
Contains the compiled class files.Not signficant
|
Definitations
|
Contains the DTD files for the various XML files that are used by the Liferay. All previous version of files are also maintained for backward compatibility.The DTD files present insidethis folder are for following types of XML files
|
Lib
|
Contains all the jar files required for development ,global and portal.To understand the difference between the these jar file read the Readme.txt file and versions.html file to know about the versions of each jar
|
nbProject
|
A folder created by NetBeans IDE.you can ignore this
|
Portal-client
|
Contains all generated webservices stubs that will be used by any client application inorder to make a SOAP based webservice call to Liferay.
|
Portal-impl
|
This contains the implementation classes of all portal and portlet functionalities
|
Portal-service
|
Contains mostly the files generated by the Service Builder
|
Portal-web
|
Contains all css,images,theme related files,JSP Files and taglib JSP for various portal features and portlets that come bundled with Liferay
|
Sql
|
Contains various migration scripts for migrating lIferay from one version to another version.
|
Support tomact
|
To support tomcat class lodaing feature
|
Tools
|
Maven
Putty
Jalopy
Selenium
YUI Compressor
Grinder
|
Util-bridges
|
Contains portlet connectors for various fameworks and technologies.Some of bridges are javascript,ruby and php
|
Util-java
|
Most commonly used classes
|
Util-taglib
|
Contains the tag handler files for thevarious taglibs that comes bundled with Liferay.
|
Follow me on
Liferay Gnosis
Subscribe to:
Comments (Atom)